If you’re searching for an Instructions Manual HSSGamestick that actually explains what to do from unboxing to fixing a “no signal” screen, you’re in the right place. These HDMI retro “game stick” consoles are designed to be plug-and-play, but small details — power supply, TV HDMI mode, controller pairing, and video output settings — can make the difference between instant fun and frustrating setup loops.
- What Is the HSSGamestick and How It Works
- What You’ll Need Before You Start
- Complete HSSGamestick Setup (Step-by-Step)
- Instructions Manual HSSGamestick: Best Settings for Smooth Gameplay
- Expanding Storage or Adding Content (Without Headaches)
- Troubleshooting Guide: Fix the Most Common HSSGamestick Problems
- FAQs
- Conclusion: Your Reliable Instructions Manual HSSGamestick Checklist
This guide walks you through a clean first-time setup, the best settings for smooth gameplay, and practical troubleshooting for the most common issues. I’ll also include a few “real-world” scenarios (like what to do at a hotel TV or a living room setup with a soundbar) so you can get gaming fast and keep it stable.
What Is the HSSGamestick and How It Works
An HSSGamestick is a compact HDMI gaming device that plugs directly into your TV’s HDMI port and runs a curated library of retro-style games through an emulator-based menu system. Most models include wireless controllers and rely on USB power (typically 5V) for stable performance.
Because the device is essentially a small computer, it behaves a lot like a streaming stick: your TV’s HDMI input settings, the quality of your power adapter, and your controller connection can all affect the experience.
You’ll also see many guides referring to “manual settings” inside the device menu — those settings can fix common problems like black screens, controller mapping issues, and audio delay.
What You’ll Need Before You Start
Most HSSGamestick kits include the stick itself, 1–2 wireless controllers, a USB power cable, and sometimes an HDMI extender. Setup is easiest when you have:
A modern TV with a free HDMI port, a stable USB power source (wall adapter preferred), and fresh controller batteries or charged controllers (depending on model).
A quick but important note on power: using a 5V adapter with higher available amperage is generally fine, because devices draw what they need — as long as voltage matches.
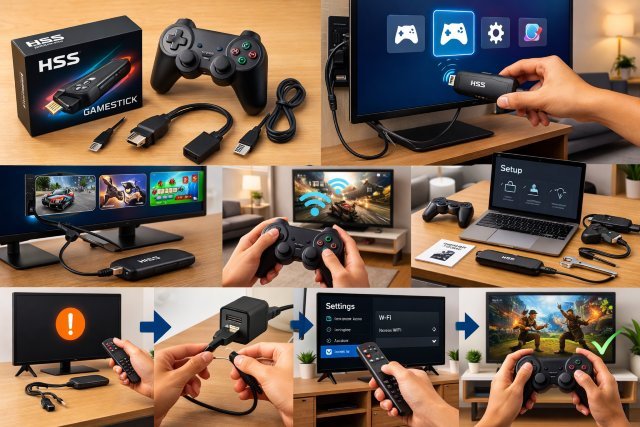
Complete HSSGamestick Setup (Step-by-Step)
Step 1: Plug Into HDMI (Use the Extender If Needed)
Insert the HSSGamestick into your TV’s HDMI port. If the stick feels cramped or presses against the TV housing, use the included HDMI extender. This reduces physical strain and can improve signal stability, especially on wall-mounted TVs.
Step 2: Connect USB Power (Don’t Rely on Weak TV USB Ports)
Connect the USB power cable to the stick and plug it into a wall adapter. Many TV USB ports are underpowered or inconsistent, which can cause random reboots, menu freezes, and controller dropouts.
If you’ve ever noticed “it boots sometimes, but not always,” that’s a classic power symptom. Using a stable 5V adapter with adequate current headroom is a simple upgrade.
Step 3: Select the Correct HDMI Input
Use your TV remote to switch to the HDMI input you plugged into. If your TV has multiple HDMI ports, note that some ports may be older-spec or configured differently.
On some TVs, a specific port or mode can limit 4K or higher refresh behavior. Port capability differences (HDMI 1.4 vs 2.0 vs 2.1) can affect how “4K sticks” negotiate output modes.
Step 4: Pair Controllers (If They Don’t Auto-Connect)
Many bundles auto-pair. If your controller doesn’t respond:
Power-cycle the stick (unplug USB power, wait 10 seconds, replug).
Power the controller off and on.
If there’s a USB receiver dongle, ensure it’s firmly connected (some models use a receiver).
If the menu appears but buttons are wrong or unresponsive, controller remapping in settings usually fixes it.
Step 5: First Boot Configuration
On first launch, you’ll usually see a game menu (sometimes organized by console/platform). Before launching games, take 2 minutes to set up:
Video output (resolution)
Language/time preferences (if available)
Controller mapping check
Audio sync/latency (if offered)
These settings prevent the most common “works on one TV but not another” problems.
Instructions Manual HSSGamestick: Best Settings for Smooth Gameplay
Different TVs and different stick firmware builds can behave differently, but these adjustments help most users.
Video Output: Choose Stability First
If your TV is older or you see flicker/blank screens, start with 1080p output. If your stick offers 4K output, only enable it after confirming your TV and HDMI port mode can support it cleanly.
HDMI versions affect what resolutions and refresh rates are reliable. For example, HDMI 1.4 supports 4K at limited frame rates, while HDMI 2.0 is commonly associated with smoother 4K at 60Hz in compatible setups.
Real-world scenario:
If your TV has one “best” HDMI port (often labeled ARC/eARC for audio or a specific high-bandwidth port), try the stick on a standard high-capability port instead of routing through a soundbar first. Soundbars/receivers can add handshake complexity.
Audio Sync: Fix Delay With Menu Settings
Audio delay is common in emulator-based devices — especially when your TV has extra processing enabled (motion smoothing, game mode off, etc.). Many HSSGamestick menus include an audio sync or delay adjustment, and some guides explicitly recommend adjusting audio synchronization when you notice lag.
Also check your TV settings:
Enable Game Mode (reduces processing delay).
Disable heavy post-processing features (motion interpolation can add latency).
Controller Mapping: Make One Profile and Stick With It
If you switch between systems (NES/SNES/Genesis/Arcade), button layouts can feel inconsistent. Take a minute to map the key buttons in the menu settings once, then test in a simple game.
Manual settings are often the fastest fix for “A button doesn’t work” or “Start doesn’t register.”
Expanding Storage or Adding Content (Without Headaches)
Some HSSGamestick variants support firmware updates or library expansion via USB or microSD. If your model supports it, back up your card before changing anything, and keep a copy of the original folder structure.
Manual-settings guides commonly recommend taking note of changes and keeping backups when adjusting emulator cores or system parameters.
Important note: Only add games you legally own the rights to. Different countries have different rules around ROM distribution, and “it’s old” doesn’t automatically mean it’s free to share.
Troubleshooting Guide: Fix the Most Common HSSGamestick Problems
Problem 1: No Signal / Black Screen
This is the #1 issue people search for.
Start with this sequence:
Confirm the TV is on the correct HDMI input.
Unplug USB power, wait 10 seconds, plug back in (power reset).
Try a different HDMI port.
Use the HDMI extender if the stick is cramped.
Lower the stick’s output resolution to 1080p in settings if you can access the menu.
If you cannot access the menu, try on a different TV first — then change resolution — then return to your main TV.
Many “black screen” fixes on similar HDMI game sticks involve resetting video output and verifying display compatibility.
Also consider HDMI port mode: some TVs need their HDMI input set to an “enhanced” mode for certain formats, and port capabilities can vary by TV model.
Problem 2: Random Reboots or Freezing in the Menu
Most often, this is power-related.
Switch from TV USB power to a wall adapter.
Use a reliable cable (cheap thin cables can drop voltage under load).
Avoid powering from a crowded power strip with unstable USB ports.
As a general principle, matching voltage and providing adequate amperage headroom helps stability; the device will draw what it needs.
Problem 3: Controller Not Working or Laggy Input
Try this:
Replace or fully charge batteries.
Power-cycle the stick and controller.
Move the receiver closer (use extender if your model’s receiver is blocked behind the TV).
Keep the stick away from dense interference zones (some TVs and streaming devices create RF noise right behind the panel).
If buttons are wrong (for example B acts like A), open manual settings and remap controls. That’s a common recommended fix.
Problem 4: Games Crash, Won’t Launch, or Run Poorly
Emulator “cores” can differ by game. Some manuals suggest switching emulator cores for ROM compatibility or performance.
Practical approach:
Test multiple games from the same system to identify if it’s a single title vs. a system-wide issue.
Lower rendering settings if available.
Avoid background music/themes if the menu offers it and you notice sluggish navigation.
Problem 5: Audio Is Out of Sync
Fix in this order:
Enable TV Game Mode.
Reduce TV audio enhancements (virtual surround, heavy processing).
Adjust the stick’s audio sync/delay setting if available.
If using a soundbar/receiver, test with the stick connected directly to the TV (then route audio out from TV). HDMI audio sync issues are common in multi-device chains, and newer HDMI standards even introduce tools to improve sync behavior in complex setups.
FAQs
What is the Instructions Manual HSSGamestick used for?
The Instructions Manual HSSGamestick explains how to connect the stick via HDMI, power it correctly, pair controllers, adjust video/audio settings, and fix common issues like “no signal,” controller mis-mapping, and game crashes.
Why does my HSSGamestick show a black screen?
Black screens usually come from the wrong HDMI input, insufficient USB power, HDMI handshake issues, or an incompatible output resolution. Try a wall adapter, switch HDMI ports, and reduce output to 1080p if possible.
Can I use a higher-amp USB adapter?
If the voltage matches (typically 5V), using an adapter that can supply more amperage is generally OK because the device draws only what it needs.
Which HDMI port should I use on my TV?
Use a standard high-capability HDMI port and avoid routing through extra devices while testing. Some TVs have different HDMI port capabilities, and choosing the right port can prevent handshake issues and resolution limits.
How do I fix controller buttons that don’t match the game?
Open the stick’s manual settings and remap the controller buttons. Remapping is commonly recommended to fix unresponsive or incorrect button layouts.
Conclusion: Your Reliable Instructions Manual HSSGamestick Checklist
A good Instructions Manual HSSGamestick isn’t just “plug it in and hope.” The most reliable setup is simple: use the HDMI extender if needed, power the stick from a stable wall adapter, confirm you’re on the correct HDMI input, and set video output to a compatible resolution before chasing bigger upgrades.
If you hit problems, manual settings are your best friend — video reset, controller remap, and audio sync adjustments solve the majority of real-world issues users report.
If you want, paste your exact HSSGamestick model name (or the text on the box/menu screen), and I’ll tailor the settings and troubleshooting steps to that specific firmware/menu layout.