Putting your Camera on Stand sounds simple: open the legs, mount, and shoot… right? In reality, small mistakes with height, balance, and angles can mean soft, shaky, or badly framed shots. The good news is that once you understand a few pro rules, your stand will become one of the most powerful tools in your kit.
- Why a Camera on Stand Is a Game-Changer
- Types of Stands for a Camera on Stand Setup
- Anatomy of a Stand: Know Your Hardware
- Step-by-Step: How to Set Up a Camera on Stand
- Getting Perfect Angles for Different Types of Shots
- Safety and Stability Tips for a Camera on Stand
- Quick Camera on Stand Setup Checklist
- FAQ: Camera on Stand Setup
- Conclusion: Master Your Camera on Stand for Perfect Angles
In this guide, you’ll learn how to choose the right stand, set it up safely, and fine-tune angles so your camera stays rock-solid and your framing looks intentional every time. We’ll walk through tripods, light stands, and overhead setups, all using the same core principles.
Why a Camera on Stand Is a Game-Changer
A solid camera stand or tripod is one of the most effective ways to eliminate camera shake and get sharper images, especially in low light or at longer focal lengths. Multiple photography resources emphasise that a tripod provides a stable base, greatly reducing movement and vibrations that cause blur. For added versatility, using an Endzone Camera setup can help stabilize shots even further while offering advanced features for tracking motion or capturing wide angles.
Even though the classic “reciprocal rule” helps you choose faster shutter speeds when shooting handheld, it’s still easy to get blur if you’re tired, shooting long lenses, or working in dim environments. Mounting your Camera on Stand lets you:
- Use slower shutter speeds for night, landscape, or product photography.
- Keep framing consistent between takes or time-lapse sequences.
- Free your hands for directing talent, styling products, or adjusting lights.
For video, a properly configured stand means smoother pans and tilts and less “micro-shake” that screams amateur.
Types of Stands for a Camera on Stand Setup
Not all stands are the same. The right choice depends on what and how you shoot.
| Stand Type | Best For | Pros | Cons |
|---|---|---|---|
| Photo tripod | General photo/video, landscapes, travel | Versatile, compact, adjustable height | Limited for heavy rigs or boom angles |
| Video tripod | Video, interviews, events | Fluid head for smooth pans/tilts | Heavier and bulkier |
| Light stand (spigot) | Static locked-off camera, overhead rigs | Tall, inexpensive, easy to move | Needs adapters; less stable sideways load |
| C-stand / combo stand | Overhead angles, complex lighting rigs | Extremely stable, great for booms | Heavy, steeper learning curve |
| Desktop stand/mini tripod | Webcams, live streams, product close-ups | Portable, table-top shots | Limited height and reach |
Modern teaching on tripod setup repeatedly stresses choosing a sturdy stand with the right head for your shooting style, then adjusting legs, center column, and head carefully for stability.
Anatomy of a Stand: Know Your Hardware
To get perfect angles, you need to know what every part does.
Legs and leg locks
- Leg sections & locks (flip or twist) control height and stiffness.
- Wider leg spread = more stability.
- Fewer extended sections = less wobble, especially in wind.
Center column
The center column gives quick height changes, but most tripod experts warn against raising it fully because it reduces stability by creating a tall, top-heavy setup.
Use it for fine adjustments, not as your main source of height. When in doubt, extend the legs first and the column last.
Feet
- Rubber feet: great for indoor floors.
- Spiked feet: dig into soil or grass outdoors for extra grip.
Heads: ball vs pan-tilt vs fluid
The head is where your camera on stand gets its angle control.
- Ball head – super fast; tilt and pan in any direction by loosening one knob. Popular for general photography.
- 3-way pan-tilt head – separate handles for tilt, pan, and roll. Slower but very precise, often preferred for still subjects.
- Fluid/video head – designed for smooth, damped pans and tilts in video work.
Choosing the right head is a huge step toward getting reliable, repeatable angles from your stand.
Step-by-Step: How to Set Up a Camera on Stand
Let’s walk through a clean, repeatable setup you can use anywhere.
Step 1: Choose a stable surface and orientation
- Place the stand on solid ground (avoid wobbly floors or unsteady tables).
- If you’re on a slope, position one leg downhill and extend it further for stability.
- For tripods, many pros recommend setting one leg under the lens direction if you’re pointing downhill, so you can lean into that leg.
A stable base is the foundation of any good camera on stand setup.
Step 2: Adjust leg height before the center column
- Unlock the largest leg sections first; they’re stiffer and more stable.
- Set the stand roughly to eye level for talking-head video or slightly above eye level for flattering portraits.
- Only after the legs are dialed in should you raise the center column a little, if needed.
Remember: lower and wider is almost always more stable than tall and narrow.
Step 3: Level the stand
Even if you’re not using a built-in level:
- Check visually that the top plate or head looks flat.
- Many stands and heads have bubble levels — use them, especially for panoramas or horizon-critical shots.
For video, a level head prevents your shots from slowly “drifting” to one side.
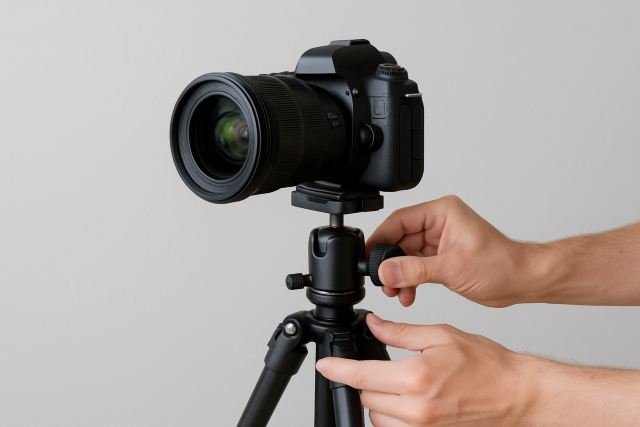
Step 4: Mount and secure the camera
- Attach the quick release plate or mounting screw firmly to the camera base.
- Make sure it’s aligned so the lens points over the center of the stand, not hanging way off to one side.
- Clip or screw the plate into the head until you hear/feel it lock.
- Tighten all knobs gently but firmly — no wobble.
Many tripod guides stress that a loose plate is one of the easiest ways to introduce shake and even drop gear.
Step 5: Position your Camera on Stand for the perfect angle
This is where the magic happens.
- For ball heads, loosen the main knob, compose your shot, then lock it again in one move.
- For pan-tilt heads, adjust tilt, then pan, then any side-tilt for vertical framing.
- For fluid/video heads, balance the camera front-to-back so it doesn’t tilt on its own, then adjust drag controls for smooth moves.
Think about:
- Eye level vs high vs low – eye level feels neutral; slightly above tends to flatter faces, while low angles can make subjects look more powerful or dramatic.
- Tilt – a tiny downward tilt can eliminate ceiling clutter; a slight upward tilt can emphasise height or scale.
Take a test shot or short video clip, then micro-adjust until the composition feels intentional.
Step 6: Lock everything and reduce camera shake
Even on a stand, there are several ways to accidentally introduce blur. Tripod-specific guides highlight issues like vibrations from wind, touching the camera, or image stabilization misbehaving when mounted.
To lock in the sharpest image:
- Tighten all head and leg locks fully.
- Use a remote shutter release or 2–10 second timer instead of pressing the button directly.
- Turn image stabilization (IBIS/IS/VR) off if the manufacturer recommends doing so on a tripod, as it can sometimes introduce blur when the camera is already stable.
- Remove or secure dangling camera straps that can catch the wind and cause vibration.
Getting Perfect Angles for Different Types of Shots
Once your Camera on Stand is rock solid, your next job is matching the angle to the content.
1. Talking-head video / YouTube / Zoom calls
- Place the stand so the lens is just above eye level and tilted slightly down toward your eyes.
- Keep the camera roughly arm’s length away for a natural perspective.
- Use a medium focal length (35–50mm full-frame equivalent) to avoid distortion.
This gives a flattering, professional look for webinars and streams.
2. Portraits and lifestyle photos
- For classic portraits, set the camera on stand at eye level or slightly above, with a gentle downward angle.
- For lifestyle or environmental shots, back up and use a longer focal length to compress the background.
- Use the stand to hold framing while you direct your subject.
You can move the subject and lights while the camera stays locked, ensuring consistent framing.
3. Product photography on a table
- Put your camera on a tripod or desktop stand at 90° or 45° to the table surface.
- Use live view and incremental height changes via the center column to fine-tune the perspective.
- For flat-lay shots, consider an overhead boom arm or C-stand so the camera points straight down.
Stability here is crucial because product images often use small aperture (f/8–f/16) and slower shutter speeds for depth of field.
4. Overhead shots and flat-lays
Overhead angles are where you really feel the value of the stand.
- Use a C-stand or boom arm rated for your camera’s weight.
- Counterweight the opposite side of the boom with sandbags.
- Double-check all clamps and keep cables tidy so nothing pulls the rig over.
Overhead rigs are amazing for food videos, DIY tutorials, unboxings, and art demos — but safety is everything.
5. Landscapes, night sky, and long exposures
For long exposures, tripod and stand technique becomes critical. Guides on long exposure and tripod use emphasise limiting vibrations, avoiding extended center columns, and using remote releases.
- Spread the legs wide and low for maximum stability.
- Avoid raising the center column unless absolutely necessary.
- Use a remote/timer and, on DSLRs, enable mirror lock-up if available.
Safety and Stability Tips for a Camera on Stand
A wobbly stand is annoying; a fallen stand is expensive.
- Use sandbags or weights on outdoor or high stands. Hitch them to the stand’s center or lower legs and let them rest on the ground for damping.
- Keep legs evenly spaced and avoid having all the weight leaning over just one leg.
- Don’t exceed the stand’s load rating, especially with long telephoto lenses or heavy rigs.
- Be mindful of people traffic — route cables safely and mark stands with gaffer tape in busy environments.
Quick Camera on Stand Setup Checklist
You can turn this into a printable or internal resource:
- Stable surface selected
- Legs extended (largest sections first)
- Center column low or only slightly raised
- Head leveled
- Camera plate firmly attached and locked
- Frame and angle dialed in (eye level/overhead/etc.)
- All locks tight, strap secured
- Remote/timer set, IS off if needed
- Sandbag/weight added if stand is tall or outdoors
FAQ: Camera on Stand Setup
1. Why are my photos still blurry even with a camera on stand?
Common causes include loose head locks, center column fully extended, wind, image stabilization hunting, or pressing the shutter too hard. Tripod shake tutorials often recommend removing straps, adding weight, using a remote release, and keeping the center column low to get the full benefit of your stand.
2. Should I use a ball head or pan-tilt head?
Ball heads are fast and flexible, great for general photography and quick compositions. Pan-tilt or 3-way heads are slower but more precise, ideal for architecture, product shots, or any situation where micro-adjustments matter. Fluid heads are best for video moves.
3. How high should my Camera on Stand be?
As a starting point:
- Talking-head video: just above eye level.
- Portraits: eye level or slightly above.
- Product/desk work: match the product height and desired angle (e.g., 45°).
- Overhead: high enough for full coverage without forcing you to over-extend the boom.
Adjust for your framing and subject, but remember that higher stands need more careful weighting.
4. Can I use a light stand instead of a tripod?
Yes, with the right adapters. Light stands plus a ball head or camera spigot are common in studios for locked-off or overhead shots, but they’re less ideal for precise adjustments or heavy horizontal loads if not properly weighted. Always ensure the stand is rated for your gear and sandbag it.
5. Do I still need fast shutter speeds if the camera is on a stand?
You can use slower speeds than handheld, especially for static subjects. However, you still need to consider subject movement (people, leaves, water) and environmental vibration. A stand removes hand shake, but not all motion.
Conclusion: Master Your Camera on Stand for Perfect Angles
A well-set Camera on Stand is more than just “some legs under your camera.” It’s a precision tool that lets you lock in sharpness, control composition, and repeat angles with confidence — whether you’re shooting tutorials in your bedroom or long exposures on a mountain.
By understanding stand types, using the legs and center column intelligently, choosing the right head, and locking down your setup with good habits (remote release, IS off when appropriate, sandbags when needed), you’ll dramatically increase the quality and consistency of your photos and videos.
Treat every setup as a quick ritual: stable base, correct height, careful leveling, secure mounting, and considered angle. Do that, and your Camera on Stand will quietly do its job in the background — so you can focus entirely on creativity and storytelling in the frame.