Creating a 3D Print of Adjustable Table Leg is one of the most practical and rewarding DIY projects for furniture makers, hobbyists, and 3D printing enthusiasts. Whether you want to repair a broken table leg, customize a desk height, or create modular furniture, a 3D-printed adjustable table leg offers flexibility, durability, and cost-effective customization.
In this complete guide, we’ll explore the design process, recommended materials, print settings, load-bearing considerations, STL options, and expert tips to help you get the best results from your build.
Why Choose a 3D Print of Adjustable Table Leg?
A 3D Print of Adjustable Table Leg is a smart solution for anyone looking to upgrade, repair, or customize their furniture. It provides flexibility that standard legs don’t offer and can be tailored to suit any project.
Benefits Include:
- Cost-effective alternative to metal furniture hardware
- Customizable height adjustment for desks, workbenches, or craft tables
- Easy to replace or reprint damaged parts
- Lightweight yet strong depending on chosen material
- Perfect for DIY makers, carpenters, and furniture designers
With the right design and material choice, these legs can carry significant weight while remaining stable.
Understanding Adjustable Table Leg Mechanisms
To create an effective 3D Print of Adjustable Table Leg, you must first understand the common mechanisms used in adjustable designs.
Popular Mechanisms
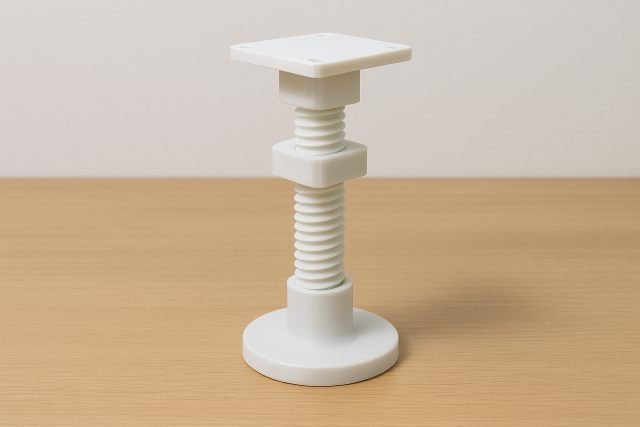
1. Screw-Based Adjustment (Threaded Design)
- Uses a threaded shaft and nut-style collar
- Offers precise micro-adjustments
- Requires well-printed threads for smooth rotation
2. Telescopic Tube Design
- Multiple cylinder sections slide into one another
- Uses clamps or detents for height locking
- Stronger and less prone to wobble
3. Ratchet & Lock System
- Similar to camera tripod legs
- Quick height adjustments
- More complex to model but very stable
Choosing the Right Material for the 3D Print of Adjustable Table Leg
Material selection is crucial because furniture legs must handle weight, pressure, friction, and environmental changes.
Recommended Materials
1. PETG (Best Overall)
- Strong, slightly flexible, and impact-resistant
- Good for threaded parts
- Handles weight without cracking
- Heat-resistant
2. ABS
- Higher durability
- Resistant to deformation
- Suitable for load-bearing designs
- Requires enclosure to print properly
3. Nylon (Industrial Strength)
- Very strong and flexible
- Great for sliding or threaded components
- Moisture-sensitive and requires controlled storage
4. PLA+ (Acceptable for Light Duty)
- Not recommended for high loads
- Works for small furniture and indoor use
- Easy to print
Optimal Print Settings for Durability
A 3D Print of Adjustable Table Leg must be printed with structural strength in mind.
Suggested Settings
| Setting | Value | Notes |
|---|---|---|
| Layer Height | 0.16–0.20 mm | Improves thread quality |
| Infill | 40%–70% | Use Cubic or Gyroid patterns |
| Walls | 4–6 perimeters | Essential for load-bearing parts |
| Top/Bottom Layers | 5–8 | Adds durability |
| Material Flow | 100–104% | Helps with strong layer adhesion |
| Print Temperature | Depends on material | PETG: 240°C–250°C |
| Bed Temperature | Depends on material | PETG: 70–80°C |
| Supports | Only where needed | Especially for threads |
Load-Bearing & Strength Considerations
When creating a 3D Print of Adjustable Table Leg, one of the biggest concerns is whether it can support a table’s weight.
How Much Weight Can It Hold?
This varies depending on:
- Material
- Infill percentage
- Wall thickness
- Leg diameter
- Internal structure
Example Strength Data
A PETG cylindrical support (40mm diameter, 4mm walls) can support up to 120–200 lbs (54–90 kg) in compression — according to tensile and compression tests published by All3DP and MatterHackers.
Tips for Maximum Strength:
- Avoid thin legs unless used on lightweight furniture
- Use threaded inserts for the top mount
- Consider reinforcing the inner core with a dowel or metal rod
- Increase perimeter walls instead of infill
Step-by-Step Guide: Creating Your 3D Print of Adjustable Table Leg
1. Download or Model Your Design
You may design your own in Fusion 360, Blender, or Tinkercad — or download from sites like:
- Thingiverse
- Printables
- MyMiniFactory
2. Check Dimensions and Mounting Style
Ensure it matches your table’s:
- Leg diameter
- Mounting screw size
- Height range
3. Slice with Strength in Mind
Use recommended settings above.
4. Print the Leg Segments
Print the leg, adjustment mechanism, and mounting plate separately when possible.
5. Assemble the Components
- Test threaded sections first
- Add lubrication for smooth adjustments
- Insert screws or bolts for the top mount
6. Perform Load Testing
Start with light pressure and slowly increase load.
Post-Processing for Better Strength & Appearance
Improve your 3D Print of Adjustable Table Leg with:
Techniques:
- Sanding for smooth movement
- Thread smoothing using a heat gun (carefully)
- Epoxy coating for strength
- Painting for aesthetics
- Adding rubber feet for stability
Troubleshooting Common Problems
1. Threads Not Fitting Properly
- Increase print resolution
- Ensure 0.1–0.2 mm clearance in CAD
2. Weak Leg or Cracking
- Increase wall count
- Switch to PETG or ABS
- Raise print temperature
3. Wobbling Table Leg
- Increase diameter of leg
- Use telescopic rather than threaded design
Recommended STL Designs for Adjustable Table Legs
Here are some popular styles:
1. Heavy-Duty Threaded Leg
- Best for workbenches
- Strong locking mechanism
2. Telescoping Cylindrical Leg
- Smooth height adjustments
- Ideal for desks
3. Ratchet Lock Leg
- Fast to adjust
- Great for workshop tables
Frequently Asked Questions (FAQ)
1. Can a 3D Print of Adjustable Table Leg support real furniture?
Yes. With the right material (PETG or ABS) and structural design, it can support heavy loads.
2. What is the strongest filament for adjustable table legs?
Nylon is strongest, but PETG is the best balance of strength and printability.
3. How do I prevent threads from binding?
Print at high resolution, use supports wisely, and apply lubrication.
4. What infill should I use for maximum strength?
50–70% Gyroid is ideal for compression strength.
Conclusion: Is a 3D Print of Adjustable Table Leg Worth Making?
Creating a 3D Print of Adjustable Table Leg is absolutely worth it — especially if you value customization, budget-friendly solutions, and DIY flexibility. With the right materials, strong design, and optimized print settings, your leg can be sturdy, reliable, and perfectly tailored to your furniture needs.
Whether you’re repairing an old table or designing new modular furniture, 3D printing gives you full control over height, strength, and style. This makes it a powerful and creative solution for both beginners and experienced makers.